FROM CLOSET. TO CASH.

Bring your best!
Make sure your item stays on the hanger and can be easily removed to try on. Items on the floor don’t sell.
Ensure shoppers can clearly see all of the item, including the size of a shoe. (Stay away from zip lock bags unless necessary)
Price to sell!
WHAT WE SELL
SUPPLIES NEEDED
Cardstock and regular printer paper for all items that will be pinned
Standard Address labels for loose items and housewares (optional)
Hangers - WIRE HANGERS MAY ONLY BE USED FOR LIGHTWEIGHT TOPS.
Pant Hangers for bottoms. No wire hangers.
Safety pins – we recommend #2 size found online at Amazon
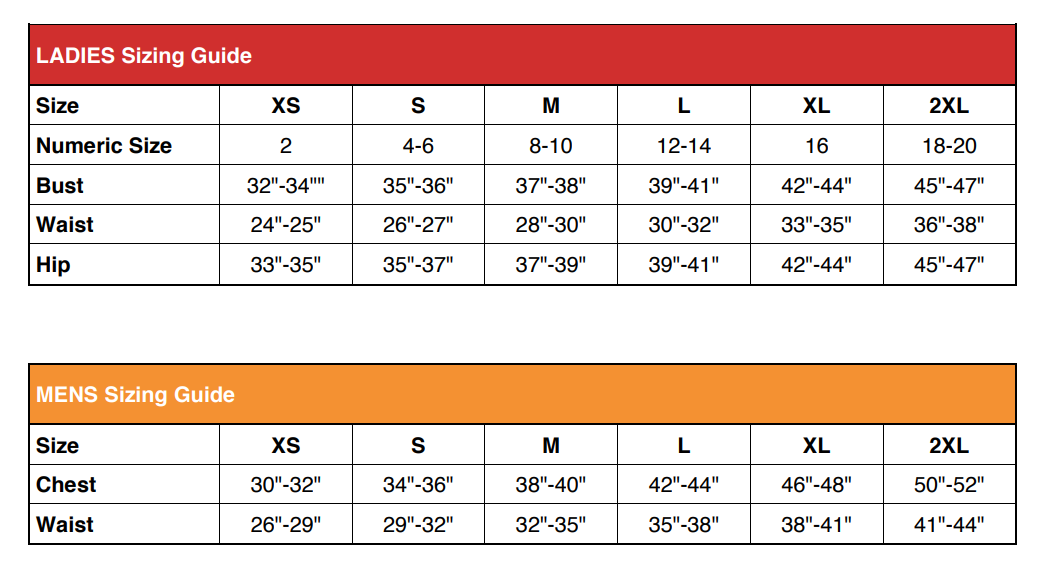
SIZING
Clothing items will be arranged by type of item, and then by sizes XS-3X. Please refer to the size chart.
PRICING
As a general rule, consider the original retail price -- whether you paid the original or not -- and take around 75 % off. This gives you a thinking range. For example, if an item’s original cost was $20, take 75% off and think of pricing the item in the general area of $4.50 to $5. If it is a "boutique" item or a current brand that is highly desirable, you can price a little higher. The same is true for items New with Tags. Use our pricing guide for recommendations.
PREPARING CLOTHING ITEMS
Use standard white cardstock/paper for tags. (referred to as tags, when printing)
Tags should then be applied to clothing items using safety pins or a tagging gun (not recommended, but accepted). Tags are to be placed on the upper right side of the clothing if using pins, and in the armpit seam if using a tagging gun.
Make sure the tag is secured. We recommend pinning/tagging in the center of the tag so the tag will withstand a light tug.
Pay attention to where the pin is stuck. Try to avoid delicate fabrics to not create permanent holes in the clothing (if too delicate, it is ok to tag the inside label in the clothing). Adjust the tag as needed in these circumstances.
Hang items on the hanger so that when looking at the front of the item, the hanger is shaped like a ? mark.
Pants MUST be on pant hangers! We have hangers available to use for free.
THE RUBBER BAND TRICK- Wrap a few rubber bands on the point of each end of the hanger. The rubber will create some grip that prevents the shirt from slipping right off. If you have a lot of wide-neck shirts, this solution probably isn’t ideal, but it can serve as a quick trick to keep that always-slipping shirt off the ground.
THE CLOTHESPIN TRICK- Buy cheap clothespins from the Dollar Tree. Clip at least one end of the item onto the hanger (we recommend both, if possible)
USING HANGERS WITH GRIP-Any hanger with built-in grippers is going to be more effective at keeping your shirts in place. Some hangers feature a rubber gripper built into each side of them to minimize slipping. Non-slip hangers are a good option for wide neck shirts or silky materials that can easily slide right off of wire and plastic hangers.
SHOES- Must be LIKE NEW
Please only bring your like-new shoes! Washing goes a long way, as well as using a magic eraser on soles. It works wonders on making them look new again!
We ask that you write the SHOE SIZE on the tag and place it inside one shoe (you can cut the barcode out of the tags to make them smaller and tape with clear packaging tape. You may also safety pin or tie a tag to a shoe lace or through the shoe eyelet. Remember the tug test!